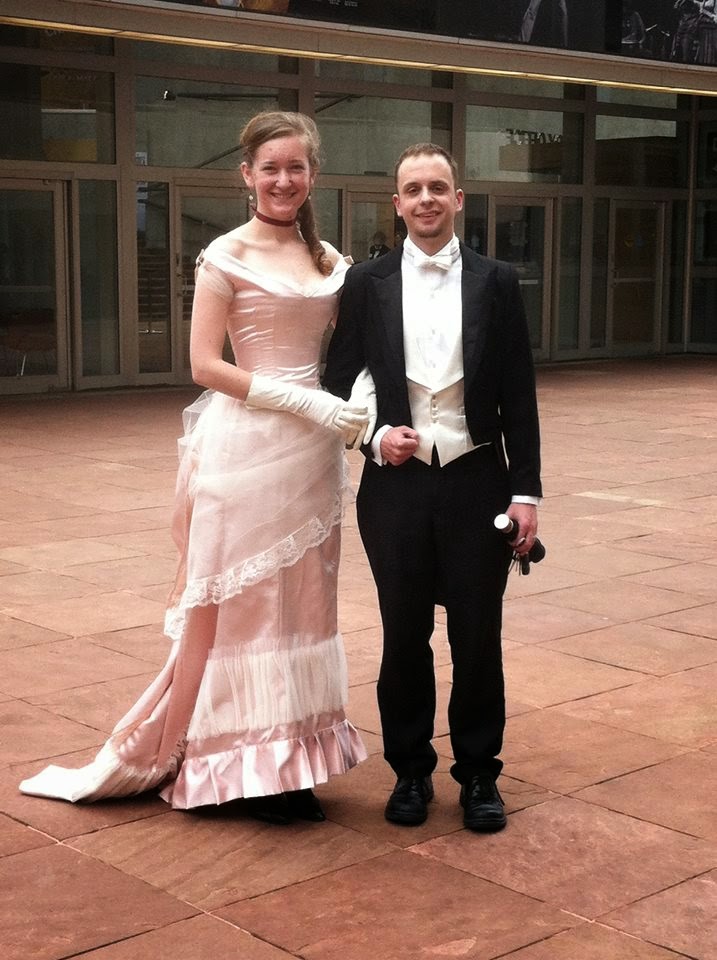
So, it's a camera-phone picture. But here it is! :) Later on after I fix a few things, I will take better pictures of the outfit (including back views and such).
I wore the thing to the Colorado Symphony with my lovely husband. I also made the shirt, vest, tie, and tailcoat that he is wearing.
For that tulle apron, I just pinned and draped until it looked like I wanted it to, and then I attached the lace to the edge. It is all one 4-layer piece of tulle yardage; there's no seam on the right hip. Just the left hip, where it goes into the zipper closure (*gasp!* I cheat. I also used a serger to finish all the skirt seams and edges...but I'm pretty sure that if the Victorian seamstresses had owned sergers, they would have used them!).

For the big pink ruffle at the bottom, I actually did not gather it at all. Instead I made a 7" tube of satin, lightly pressed it, and pleated only the top edge to the skirt. It made a fun, dimensional effect that I really liked. After that, I added the crazy pipe-organ ruffle above it, like so...


I would pin one edge, using my finger for a spacer, then pin the other edge to match. It's 4 pieces of tulle treated as 1 piece. It definitely took longer than expected, but I got faster near the end!
The back drapery piece is simply a very giant rectangle, underlined in muslin and edged in lace, like so:


And then I pleated it onto the back waistband area, before actually attaching the waistband:


I cheat :) It has an invisible zipper at the left hip.

I picked up a few points in the middle of the drapery piece and tacked them up near the waistband to give it this effect.
~~~~~~~
On my original sketch, I had planned to put fabric roses and leaves on the shoulder tips, at the hip, and wrapped around that layer of pipe-organ pleats. But I decided that the rose garland I had bought was just too overwhelming, and so it only was applied at the hip, where the zipper is.
~~~~~~~~~~~
The bodice!
It's boned with non-period 1/4" rigilene.
Rigilene can be sewn through by machine, so it is a breeze to install because all you have to do is run a big long stitch down your seam allowances and it's in! No casings, no tragic snapping of basket canes, no cutting and tipping of spiral steel...*sigh* it's pretty nice. And I use it here because I thought it would be the best way to get the silhouette I wanted. It's flatter than steel or cane, and somewhat heat-mouldable as far as curves.

As you can see, the bodice is underlined with muslin. The eyelets are all poked with an awl, then just whipstitched with a nice buttonhole twist thread around the inside edge to hold them in place. When finished, it will lace up the back and the edges will meet (so there's no skeezy corset-effect of skin showing).


Which took about 2 hours, I believe. Not too bad!
The little cap-sleeves were just rectangles of tulle. I pinned them till I got the effect I wanted (nice and bunchy at the front and back and underside, but tapering away at the top of the shoulder), then stitched them down on the inside armhole. The velvet bows were made by cutting lengths and stitching them together, then applying it to the dress in the same vein (small whipstitches and tack stitches).
The little cap-sleeves were just rectangles of tulle. I pinned them till I got the effect I wanted (nice and bunchy at the front and back and underside, but tapering away at the top of the shoulder), then stitched them down on the inside armhole. The velvet bows were made by cutting lengths and stitching them together, then applying it to the dress in the same vein (small whipstitches and tack stitches).


Yep! That was pretty much it :) There were originally plans to use a lot more of that velvet ribbon on the back, but after pinning it on, I decided I liked the simple seam lines on their own and that the velvet was overwhelming.
There was no petticoat worn underneath, just a good corset and a modern slip. I did wear these fantastic vintage shoes....
There was no petticoat worn underneath, just a good corset and a modern slip. I did wear these fantastic vintage shoes....

And the gloves are kid gloves from the 1950s (never worn before I wore them, apparently! They still had the tag).
~~~~~~~~~~~~~~~~~~
Total pricetag: ~$150.00
~~~~~~~~~~~~~~~~~~
Total pricetag: ~$150.00
Total Hours: ~ 40
Seeing many old people smile: Priceless
~~~~~~~~~~~~~~~~~~~
I may in the future actually do the extra work of adding the velvet ribbon strapwork on the back of the bodice, and all the extra flowers. I think they would take it from my modern idea of Victorian into really period Victorian--but it's just a little over-the-top for my very simple sensibilities. I learned quite a bit about skirt shapes and working with satin from doing this dress, and had some fun trying out the new and strange ruffles. I don't know if I would make another one for myself, but I'd be happy to do one for a client.
Thanks for following the journey of this dress! Stay tuned; there are plans for a medieval-inspired dress in the works, and Sabriel is still slowly progressing. :)
Michelle the dress is beautiful!! Thank you for sharing your journey.. enjoyed the pictures. I look forward to seeing the Medieval period dress. (That is the era I enjoy the fashions of most)
ReplyDelete