I started this costume a few months before I started the blog, but as it is a very large, long-term project, I will document its construction and process here as well.
~~~~~~~~~~~~~~~~~~~~
One of my favorite fantasy series is the Abhorsen trilogy, by Garth Nix. I picked up the middle book, called Lirael, totally by chance. I was a teenager in a library, and it had a beautiful cover. Also the first book was checked out, unbeknownst to me. ;)

I love the world of these books and I still re-read this series from time to time. While Lirael has a special place in my heart as the shy, bookish teenager who just wants to belong, the costume of the first book's heroine is much more striking....
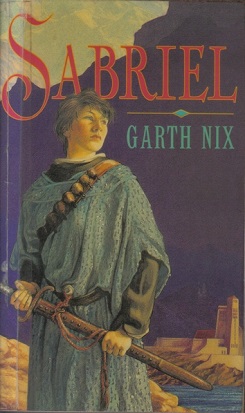
I mean just....wow. Check out all that embroidery! And bells! and a sword! There are a few Sabriel cosplays out there already, but I want to do a more couture version and really bring out the ooooh SHINY factor.
~~~~~~~~~~~~~~~~~~
I decided to go mostly with the design that these lovely book-cover artists (Leo and Diane Dillon) came up with--changing some small things. My surcoat is going to have the same neckline, colors, trim, and basic shape, but the bell sleeves will end at the elbow instead of having the long trailing bits. I'm basing the bottom half on a standard medieval tabard-- basically squared down from the hips, ending about knee-level, with a riding slit at the front right leg up to just under the hip.
Some surcoat embroidery tests on wool crepe scraps, with good ol' DMC silver and gold thread...

I decided I liked the silver keys by themselves better than with the gold 7-point stars (a feature of Lirael's character, those stars). My fabric for the real thing is a lightweight wool crepe.
After a few tests and calculations, I decided to make the armor layer (described in the book as tiny-scaled, almost ceramic in nature) out of beads. Totally not practical as actual sword-stopping armor, but it looks pretty fabulous. Perhaps think of it more like a ceremonial, formal-occasion version of Sabriel--not so much the out-in-the-field fighting the enemies version.
I considered using Tilapia fish leather (wild, I know!) as a more obviously scaly option. It was somewhat expensive, but looked pretty and would have been slightly faster than couching rows of strung bugle beads, as I did decide to do (below, on the left). The real decider was the awkward shape, size, and inflexibility of the leather, as well as its 1-way pattern.

So, what I am doing for the armor layer is couching these beautiful Ming Tree rainbow grey 1/4" bugle beads onto a layer of black medium-weight linen. Hopefully lightweight enough to breathe at faire, but sturdy enough to hold the weight of all that glass.

It's been awhile since I started the beads, and I've got the collar and most of the right sleeve done. Here are some in-progress pictures of the pieces on the loom ( a sturdy scroll-frame model meant for needlepoint).


The beads are only going where they'll be seen, of course-- the sleeves from about mid-bicep down to the wrist, and the neck pieces in front and back. I'm making a whole armor-layer piece of linen, but these beaded pieces will be seamed onto the base armor-layer. The armor layer stops about hip level, so there may be a bit of beading that has to go on where the riding slit starts at the hip, but I'll wait and see.
The pattern pieces were drafted from my basic torso sloper made with help of the lovely textbook Patternmaking for Fashion Design. The armor layer muslin looked like this...

The pattern pieces were drafted from my basic torso sloper made with help of the lovely textbook Patternmaking for Fashion Design. The armor layer muslin looked like this...
with the sash to stand in visually for the bell bandolier. I like the belt, so I may end up using it in the real thing depending on what kind of leather/faux leather I decide on for the bandolier and scabbard.
I will add the nice swallowtail bits sticking out of the wrists and collar on the finished armor--probably white silk chiffon or something equally wispy. Also it will close up the back and not the front ;)
~~~~~~~~~~~~~~
I will add the nice swallowtail bits sticking out of the wrists and collar on the finished armor--probably white silk chiffon or something equally wispy. Also it will close up the back and not the front ;)
~~~~~~~~~~~~~~
More posts coming as I work on this project!
No comments:
Post a Comment